Build AI data analyst with sandboxed code execution using TS, and GPT-4o


This is an example that tests the capabilities of the OpenAI's GPT-4o model. We let it generate a chart and reason about it. We use the E2B Code Interpreter SDK for running the LLM-generated code tasks in a secure and isolated cloud environment.
Why Code Interpreter SDK
In this TypeScript example, we will show how to give GPT-4o a code interpreter powered by the open-source Code Interpreter SDK by E2B. This SDK quickly creates a secure cloud sandbox powered by Firecracker. Inside the E2B sandbox is a running Jupyter server that the LLM can use.
In general, the Code Interpreter SDK allows you to build custom code interpreters. For example, you can install custom packages, have access to the internet, use the filesystem, or connect your cloud storage. The Code Interpreter SDK works with any LLM. (in this example, we are using it with the OpenAI's newest GPT model.)
Key links
Overview
- Installations and prerequisites
- Saving API keys
- Imports and configuration
- Setup of model and tools
- Creating code interpreter
- Defining interaction with model
- Running the program
Setup
1. Installations and prerequisites
First, initialize a new npm project and install all the dependencies we are going to need.
npm init -y
npm i @e2b/code-interpreter dotenv openai
npm i --save-dev @types/node ts-node tsx typescript
Add the script to start the program. Your "main" file should be called app.ts.
"start": "tsx app.ts"Your package.json file should look like this:
{
  "name": "gpt-4o-code-interpreter",
  "version": "1.0.0",
  "description": "This is an example of running LLM-generated code tasks in a secure and isolated cloud environment using the E2B Code Interpreter SDK.",
  "main": "app.ts",
  "scripts": {
    "start": "tsx app.ts"
  },
  "keywords": [],
  "author": "",
  "license": "ISC",
  "devDependencies": {
    "@types/node": "^20.12.11",
    "ts-node": "^10.9.2",
    "tsx": "^4.9.3",
    "typescript": "^5.4.5"
  },
  "dependencies": {
    "@e2b/code-interpreter": "^0.0.5",
    "dotenv": "^16.4.5",
    "openai": "^4.46.1"
  }
}
2. Saving API keys
Now we create the .env file where you store your the E2B API KEY and OPENAI API KEY. You can copy this .env.template to your .env file:
# TODO: Get your E2B API key from https://e2b.dev/docs/getting-started/api-key
E2B_API_KEY=""

# TODO: Get your OpenAI API key from https://platform.openai.com/settings.
OPENAI_API_KEY=""
3. Imports and configuration
In the app.ts, we import the file system module, OpenAI's API, the E2B code interpreter for code execution, and dotenv for managing environment variables.
We load the environment variables from the .env.
import fs from 'node:fs'
import { OpenAI } from 'openai'
import { CodeInterpreter, Result } from '@e2b/code-interpreter'
import { ProcessMessage } from '@e2b/code-interpreter'

import * as dotenv from 'dotenv'
import { ChatCompletionTool, ChatCompletionMessageParam } from 'openai/resources/index'

dotenv.config()
4. Setup of model and tools
Then we define constants and a system prompt to guide the behavior of our Python data scientist assistant. The MODEL_NAME constant specifies the LLM we are using, which is gpt-4o. The SYSTEM_PROMPT is a detailed set of instructions for overall behavior of the AI agent that we are building. We are focusing on analyzing and visualizing data, but you can adjust the prompt according to your use case.
const MODEL_NAME = 'gpt-4o'
const SYSTEM_PROMPT = `
## your job & context
you are a python data scientist. you are given tasks to complete and you run python code to solve them.
- the python code runs in jupyter notebook.
- every time you call \`execute_python\` tool, the python code is executed in a separate cell. it's okay to multiple calls to \`execute_python\`.
- display visualizations using matplotlib or any other visualization library directly in the notebook. don't worry about saving the visualizations to a file.
- you have access to the internet and can make api requests.
- you also have access to the filesystem and can read/write files.
- you can install any pip package (if it exists) if you need to but the usual packages for data analysis are already preinstalled.
- you can run any python code you want, everything is running in a secure sandbox environment.
`
We list the array of tools that the agent will be able to use. In this case, we give it only one tool called execute_python that will leverage the E2B code interpreter.
The tools is defined as a "function" which is an abstract concept that contains the 'parameters' schema ensuring that when the agent "decides" to use a tool, it receives all the necessary information in the correct format.
// Creating a list of tools available for the agents
const tools: Array<ChatCompletionTool> = [
    {
      'type': 'function',
      'function': {
        'name': 'execute_python',
        'description': 'Execute python code in a Jupyter notebook cell and returns any result, stdout, stderr, display_data, and error.',
        'parameters': {
          'type': 'object',
          'properties': {
            'code': {
              'type': 'string',
              'description': 'The python code to execute in a single cell.',
            },
            'unit': {'type': 'string', 'enum': ['celsius', 'fahrenheit']},
          },
          'required': ['code'],
        },
      }
    }
  ]
5. Creating code interpreter
In this part, we define a codeInterpret function to execute Python code using the E2B Code Interpreter SDK. The function takes two parameters: an instance of the CodeInterpreter and the Python code to be executed as a string.
// Definine the function to execute code, using the E2B Code Interpreter SDK as a tool
async function codeInterpret(codeInterpreter: CodeInterpreter, code: string): Promise<Result[]> {
    console.log('Running code interpreter...')

    const exec = await codeInterpreter.notebook.execCell(code, {
        onStderr: (msg: ProcessMessage) => console.log('[Code Interpreter stderr]', msg),
        onStdout: (stdout: ProcessMessage) => console.log('[Code Interpreter stdout]', stdout),
        // You can also stream additional results like charts, images, etc.
    })

    if (exec.error) {
        console.log('[Code Interpreter ERROR]', exec.error)
        throw new Error(exec.error.value)
    }
    return exec.results
}

const openai = new OpenAI() // Initialize openai client
Then we define a chat function that initializes an array of messages with GPT-4o. It accepts an instance of the CodeInterpreter, a user message as a string, and an optional base64-encoded image string. The latter is useful to showcase the capabilities of GPT-4o to "see" visual output it generated and react to it.
The chat function also checks for tool calls, particularly looking for the execute_python function. If found, it extracts the code to be executed and calls the previously defined codeInterpret function to run the code in the E2B sandbox (a secure cloud environment).
// Define function to chat with the model
async function chat(codeInterpreter: CodeInterpreter, userMessage: string, base64_image?: string): Promise<Result[]> {
    console.log(`\n${'='.repeat(50)}\nUser Message: ${userMessage}\n${'='.repeat(50)}`)
    const messages: Array<ChatCompletionMessageParam> = [
        {
          role: 'system',
          content: SYSTEM_PROMPT,
        },
      ]

      if (base64_image) {
        messages.push({
          role: 'user',
          content: [
            {
              type: 'text',
              text: userMessage,
            },
            {
              type: 'image_url',
              image_url: {
                url: `data:image/jpeg;base64,${base64_image}`
              }
            }
          ]
        })
      } else {
        messages.push({ role: 'user', content: userMessage })
      }

      try {
        const response = await openai.chat.completions.create({
          model: MODEL_NAME,
          messages: messages,
          tools: tools,
          tool_choice: 'auto'
        })

        for (const choice of response.choices) {
          if (choice.message.tool_calls && choice.message.tool_calls.length > 0) {
            for (const toolCall of choice.message.tool_calls) {
                if (toolCall.function.name === 'execute_python') {
                    let code: string
                    if (typeof toolCall.function.arguments === 'object' && 'code' in toolCall.function.arguments) {
                        code = (toolCall.function.arguments as { code: string }).code
                    } else {
                        code = toolCall.function.arguments as string
                    }
                    console.log('CODE TO RUN')
                    console.log(code)
                    const codeInterpreterResults = await codeInterpret(codeInterpreter, code)
                    return codeInterpreterResults
                }
            }
          } else {
            console.log('Answer:', choice.message.content)
          }
        }
      } catch (error) {
        console.error('Error during API call:', error)
      }
      return []
    }
6. Defining interaction with model
In this step, we put together what we have defined and use it in the run function. The function creates an instance of the CodeInterpreter. It then makes a call to the chat function, asking the LLM to do the task specified in the prompt, in this case generating a random differential equation and a chart with its solution.
You can easily modify the prompt for other data analysis and coding examples.
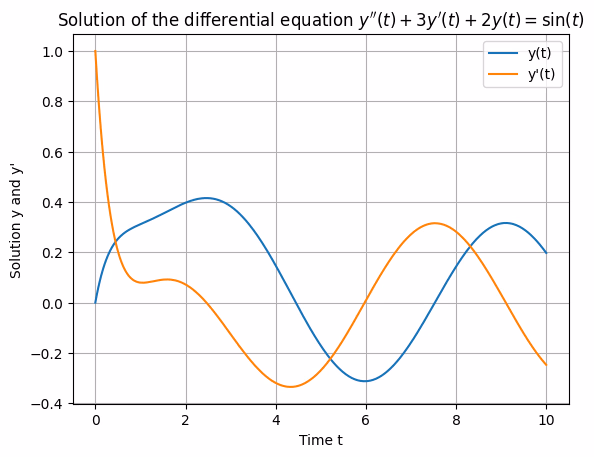
After the first output, the function makes a second call to the chat function. Here it is asking the GPT-4o model to interpret the plot it just created and generate a new plot with different initial conditions.
async function run() {
    const codeInterpreter = await CodeInterpreter.create()
    // Let the model do the task
    try {
        const codeInterpreterResults = await chat(
            codeInterpreter,
            'Write a second order differential equation with initial conditions and plot its solutions on a chart, add the conditions to description.'
        )
        console.log('codeInterpreterResults:', codeInterpreterResults)

        const result = codeInterpreterResults[0]
        console.log('Result object:', result)

        if (result && result.png) {
            fs.writeFileSync('image_1.png', Buffer.from(result.png, 'base64'))
        } else {
            console.log('No PNG data available.')
            return
        }

        const codeInterpreterResults2 = await chat(
            codeInterpreter,
            'Based on what you see, can you tell me what is the differential equation whose solutions are plotted in the chart? Then make a new plot with the same equation, but different initial conditions.',
            result.png
        )
        console.log('codeInterpreterResults:', codeInterpreterResults2)

        const result2 = codeInterpreterResults2[0]
        console.log('Result object:', result2)

        if (result2 && result2.png) {
            fs.writeFileSync('image_2.png', Buffer.from(result2.png, 'base64'))
        } else {
            console.log('No PNG data available.')
        }
    } catch (error) {
        console.error('An error occurred:', error)
    } finally {
        await codeInterpreter.close()
    }

}

run()
7. Running the program
Finally, we can start the program. If the results contain PNG data, it is saved to a new file in your directory. (If no PNG data is available, it logs a message.)
npm run start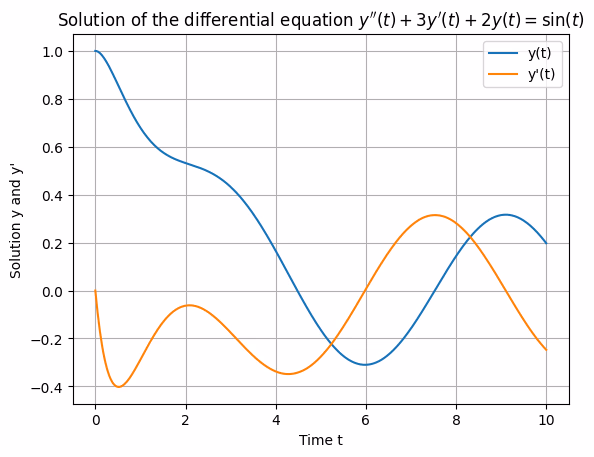
Key links
Secure AI Sandbox