Microsoft's AutoGen - A guide to code-executing agents

After the initial hype around AI agents, there has been a cooling-off period as people realize that AI agents are not that autonomous. An agent won’t create the whole complex program dreamed up by a no-code user. Usually, until reaching a desired quality, agents' output needs multiple iterations.
These iterations may not be just human-agent, but rather among a higher number of agents specialized in narrow areas. For example, one agent writes a code specified by the end user, another agent then takes over and debugs the code, then hands it to another agent who can visualize the data, and so on.
Recently launched AutoGen by Microsoft has gained especially big popularity among multi-agent frameworks.
Simple Guide to AutoGen
What is special about AutoGen is that it is execution-capable of the code output it produces.

We will hence focus on that feature and create a simple data visualization Python script, where we explore different types of AutoGen pre-defined agent classes, and demonstrate how AutoGen generates and runs code. I hope it helps understand the principles of AutoGen.
See the final code in on GitHub
1. Install AutoGen
Start with installing AutoGen from their documentation or from GitHub.
pip install pyautogen
pip install "pyautogen[blendsearch]" for optional dependencies
AutoGen offers good support on their Discord, even though I don’t know whether it’s official. It also provides a page with concisely written Examples from which I choose the data analyst one to try.
2. Import packages
AutoGen has a default abstract class called Agent that can communicate with other agents and perform actions. Agents can differ in what actions they perform in the receive method. We import AssistantAgent and UserProxyAgent classes, which are both subclasses of a more generic class - ConversableAgent. (We will get to this later.)
from autogen import AssistantAgent, UserProxyAgent3. Get API Keys
Now, we get our API keys. I store mine as the .env variable.
import os
import openai
from dotenv import load_dotenv
load_dotenv()
4. Create the agents
In this step, we can define a set of agents with specialized capabilities and roles.
We create an instance of the AssistantAgent class representing the chatbot that will respond to the user input and an instance of the UserProxyAgent class representing the user that will initiate the conversation.
The LLM inference configuration in AssistantAgent can be configured via llm_cofig.
assistant = AssistantAgent(name="assistant")
user_proxy = UserProxyAgent(name="user_proxy")
5. Define the interaction
After creating the agents, the script initiates a chat between the user and the chatbot by calling the initiate_chat method on the user_proxy instance. The initiate_chat method takes two arguments: the assistant instance, which represents the chatbot, and a message string that contains the task description.The script then creates a text completion request using the openai.Completion.create method.The config_list parameter is set to a list that contains a dictionary with the model name, API base URL, API type, and API key.The prompt parameter is set to a string that contains the text to be completed. The Completion.create method sends a request to the OpenAI API and returns a response that contains the completed text.
user_proxy.initiate_chat(
    assistant,
    message="""Hello, today you are my data analyst assistant and you should help me visualize data, make predictions, and explain your thinking.""",
)
response = oai.Completion.create(
    config_list=[
        {
            "model": "chatglm2-6b",
            "api_base": "http://localhost:8000/v1",
            "api_type": "open_ai",
            "api_key": "NULL", # just a placeholder
        }
    ],
    prompt="Hi",
)
print(response)
6. Create a chat completion request
Finally, we create a chat completion request using the openai.ChatCompletion.create method. The config_list parameter is set to the same list as before, and the messages parameter is set to a list that contains a dictionary with the role and content of the user's message.The ChatCompletion.create method sends a request to the OpenAI API and returns a response that contains the chatbot's response to the user's message.
response = oai.ChatCompletion.create(
    config_list=[
        {
            "model": "chatglm2-6b",
            "api_base": "http://localhost:8000/v1",
            "api_type": "open_ai",
            "api_key": "NULL",
        }
    ],
    messages=[{"role": "user", "content": "Hi"}]
)
print(response)
Output
As I mentioned earlier, AssistantAgent and UserProxyAgent classes are both subclasses of a more generic class - ConversableAgent.
The AssistantAgent (a subclass of ConversableAgent) is designed to solve a task with LLM. This agent doesn't execute code by default and expects the user to execute the code. After the AssistantAgent produces code output, the user can execute the code by pressing Enter.
I chose my agent to visualize data, which is a task requiring multiple steps like planning the process, writing the code, and executing it in visual form. That should best show its capabilities.
First, the program answers to my default intro message:
message="""Hello, today you are my data analyst assistant and you should help me visualize data, make predictions, and explain your thinking."""
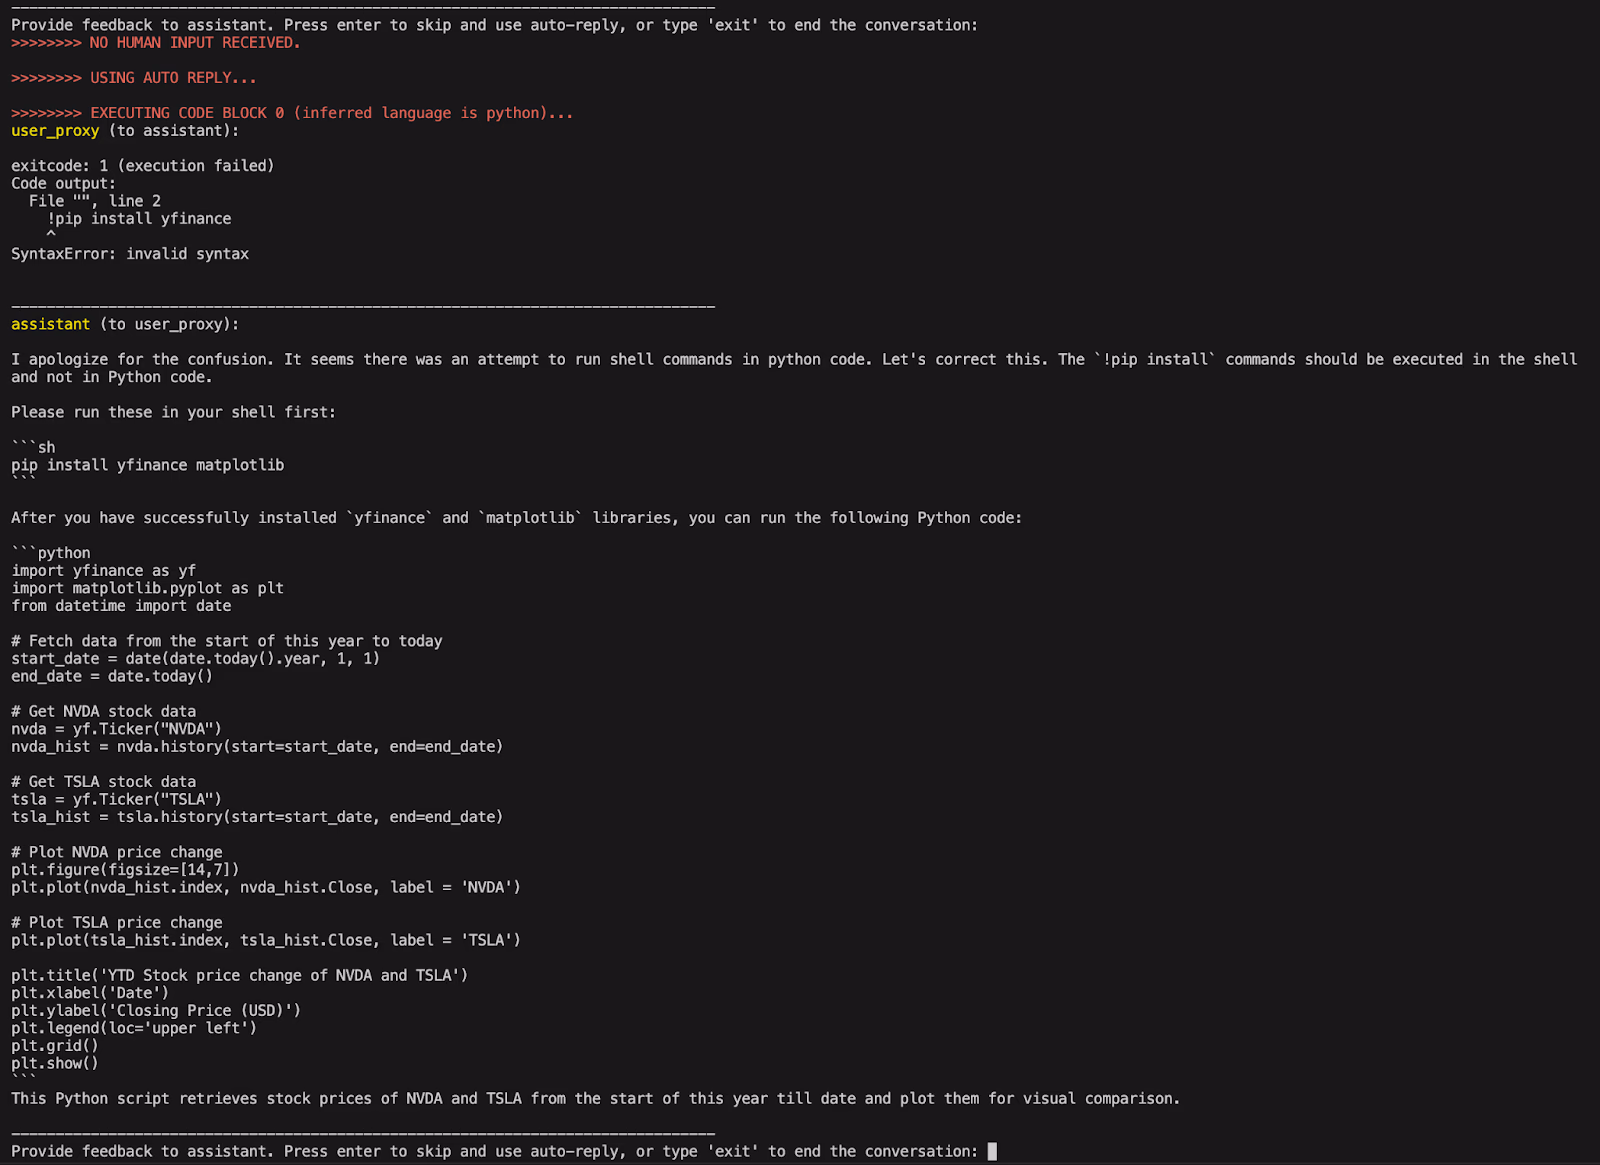
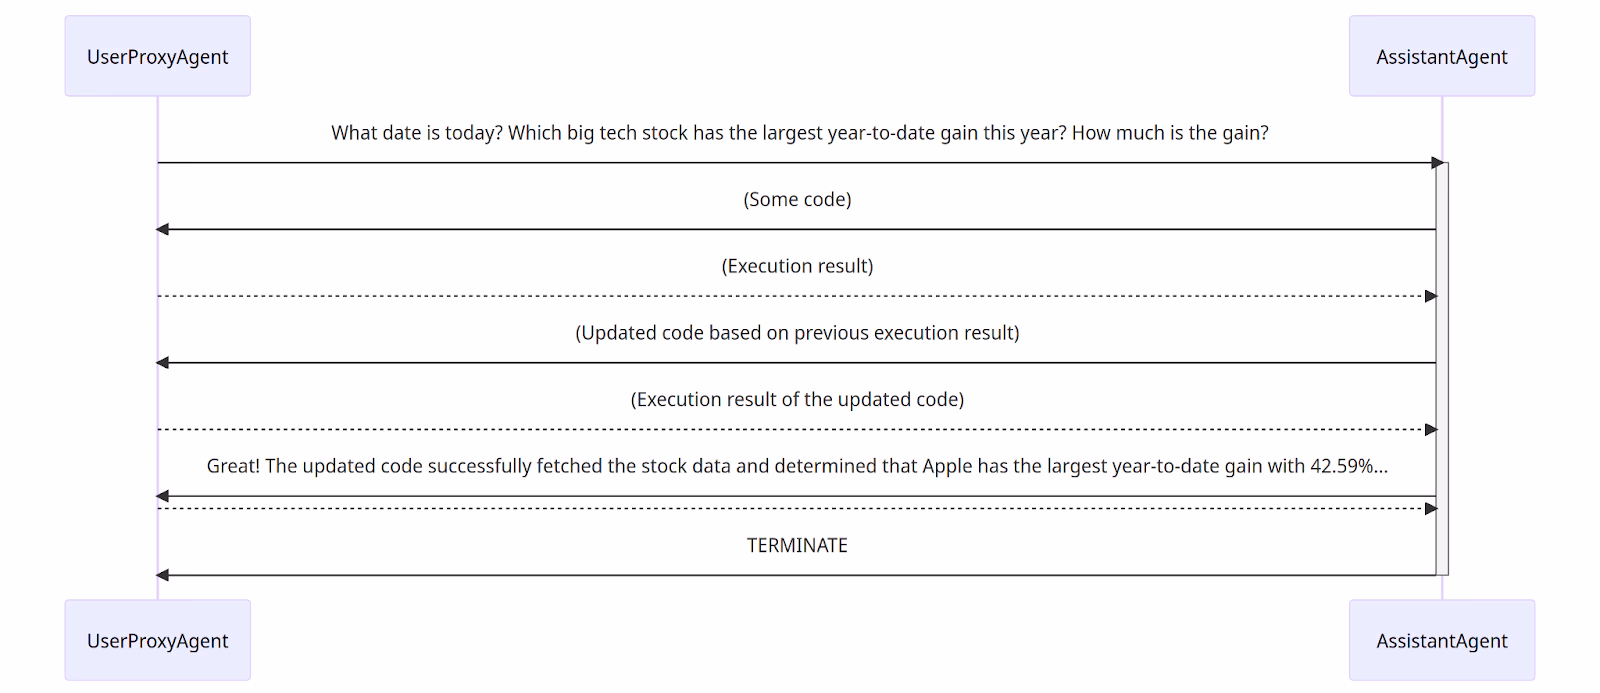
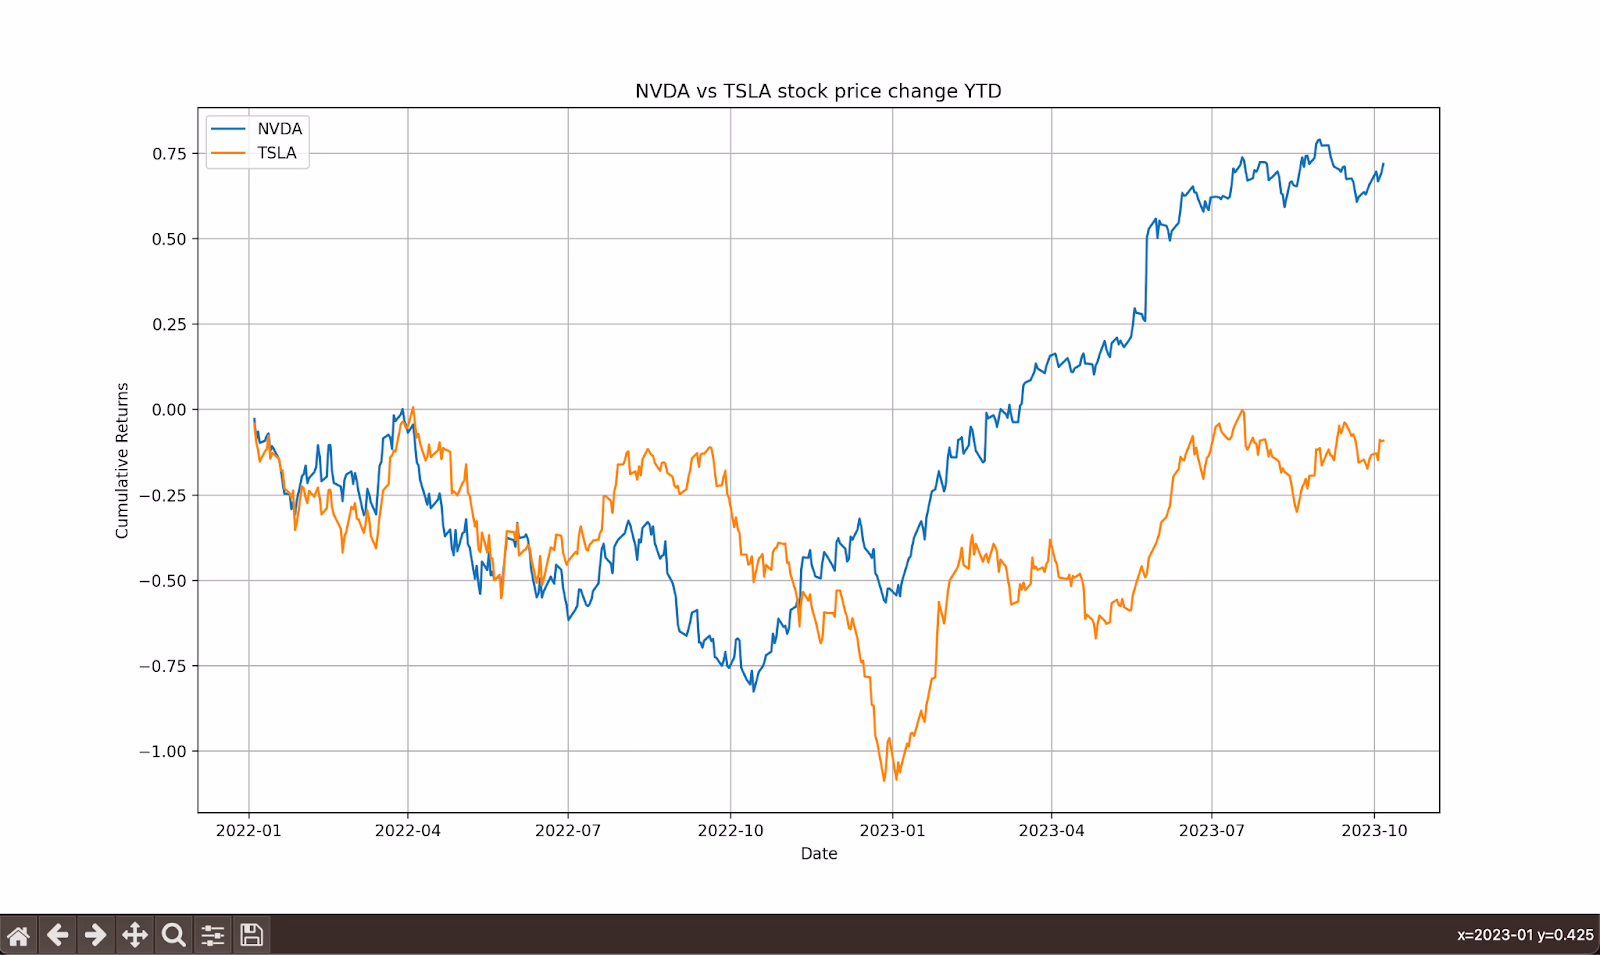
I now instruct the agent to plot a chart of NVDA and TESLA stock price change YTD. It then prints user input and devises an action plan - which may include even installing new libraries.
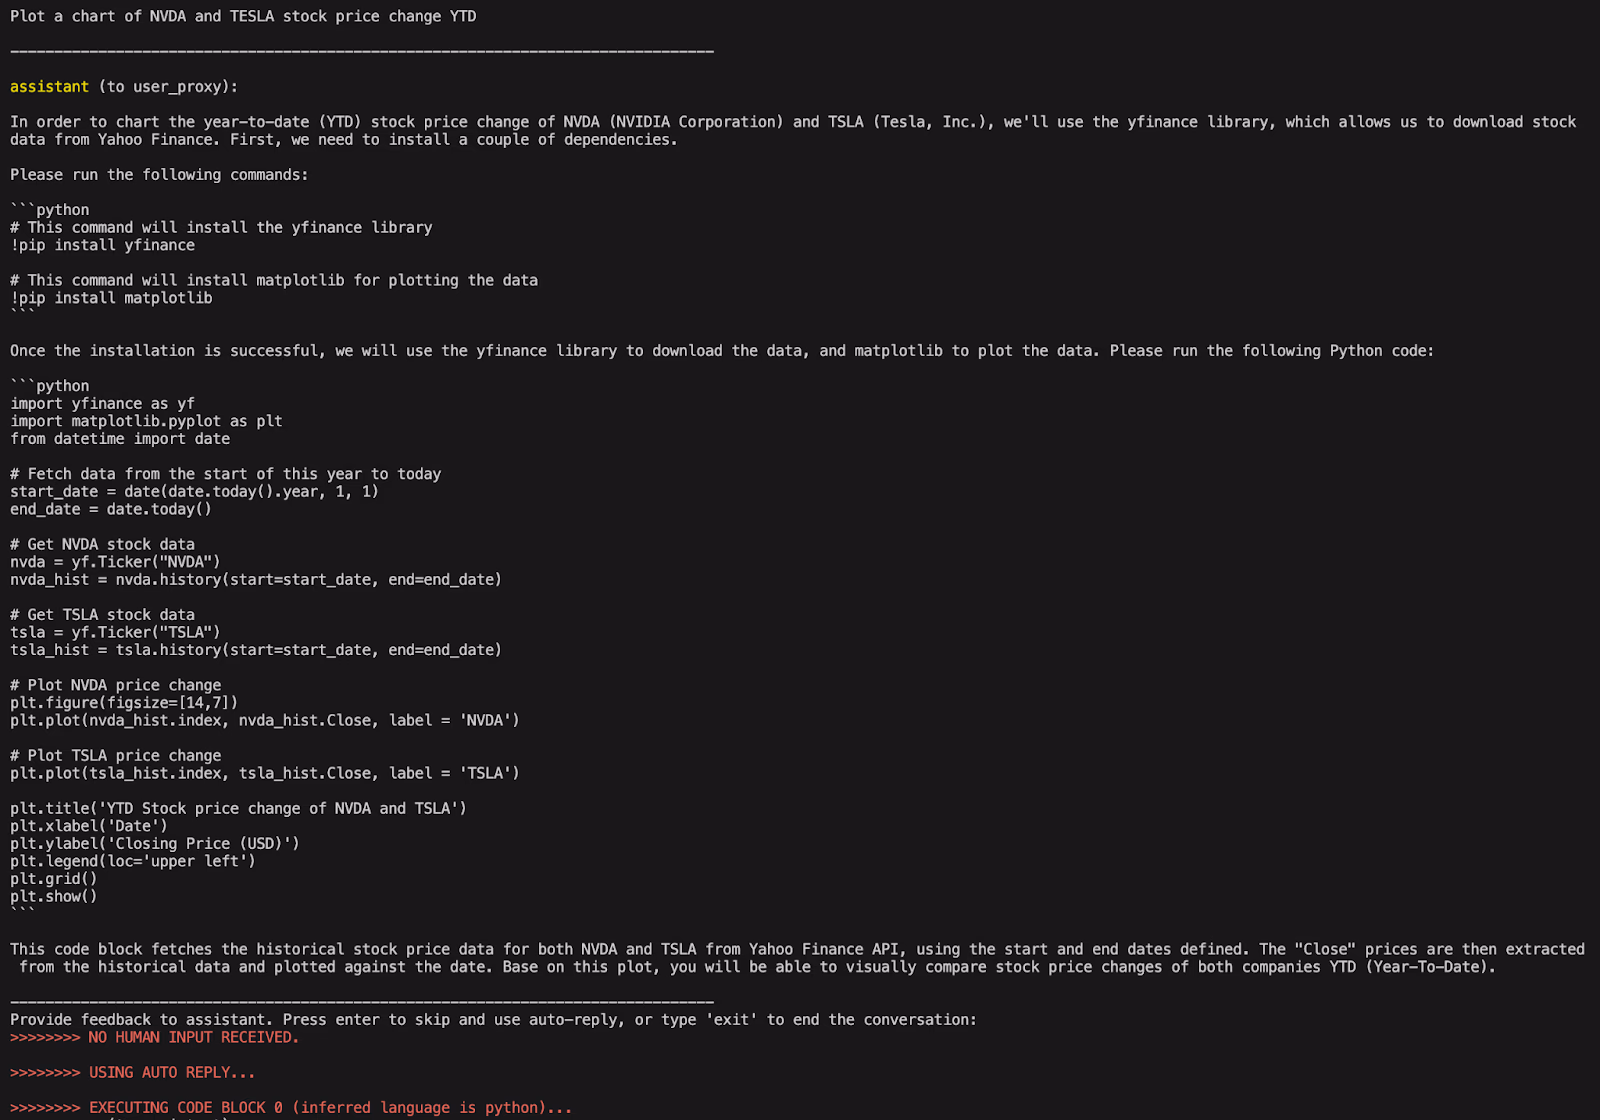
The agent returned a code that contains an error that is indicated under user_proxy. Here, the user_proxy is used as another agent that provides feedback to the assistant, as opposed to a human instructing the agent with a prompt to fix the code.
The assistant makes another iteration that seems to be functioning code. This was a nice example of self-healing code.
The following diagram summarizes the workflow of iterating between multiple agents.
Code execution
The output explains what happens if the user (you) decides to run the code. You can always execute the proposed code by pressing “enter”.
When a human user chooses to execute the code, the output opens in a new window like this:
It is possible to configure various arguments of the AutoGen agents. It is open-source, and I like how their docs are structured.
When modifying the ConversableAgent class, you can change the code_execution_config argument in the __init__ method to even disable the execution of the code.
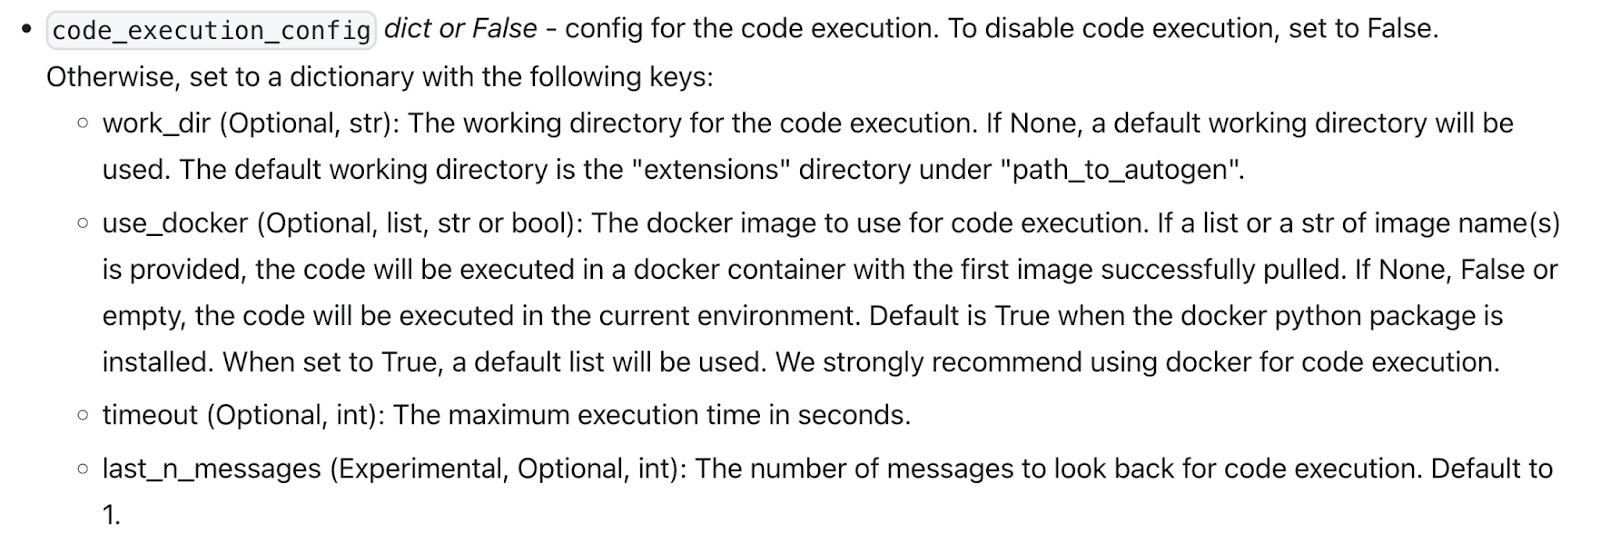
You can also modify the way to execute code blocks, single code blocks, or function calls, by overriding execute_code_blocks, run_code, and execute_function methods respectively.
The code from AutoGen agents is executed locally via use_docker - Bool value of whether to use docker to execute the code, or str value of the docker image name to use or None when code execution is disabled.

Potential limitations
Why would you want to keep a close eye on the execution of the code run locally via Docker?
As the Docker security article mentions,
One primary risk with running Docker containers is that the default set of capabilities and mounts given to a container may provide incomplete isolation, either independently, or when used in combination with kernel vulnerabilities.
Granting autonomous AI tools access to executing code locally may be a challenge, especially for enterprise users.
Alternative solutions may be:
- A better isolation of containers achieved by adding some barriers between them. However, containers like Docker would still use shared resources as the kernel.
- Another option is using sandboxed cloud environments. This provides security for running any code, starting processes, using the filesystem, and so on.
Another challenge with agent frameworks is scalability when the product acquires hundreds or thousands of users each developing their own AI applications, which would require thousands of containers.
This problem is solved for example by using cloud with E2B SDK.
AutoGen Use Cases
I found a few examples of how people try AutoGen. It seems like it is still experimenting with the framework mostly for fun purposes, but maybe a time shows whether AutoGen becomes regularly used for work purposes too.
- Snake Game Development with AutoGen - A project structured around a group chat setup where different agents collaborate to bring the snake game to life. YouTube video
- Enhanced Agents - Debuting with a MemoryEnabledAgent with improvements in context/token control, portability, and PnP functionality
- Scene Writer - A simulation of a fictional scene with AI screenwriters, a couple of assistant agents, and a critique
- AgentXP - A self-improving agent that is eventually able to write itself
- Meme creator
- Agentcy - An example with agents’ roles such as Account Manager, Strategist, Marketer, Researcher, or Designer
Resources
Secure AI Sandbox